Hello! you wanted to know how to install WordPress in cPanel? You might also be interested in learning about essential things that are crucial to accomplish before & after installing WordPress in cPanel?
If yes, then You have landed in the right place. If you know how to install WordPress in cPanel, you will probably be aware of the essential things required before installing WordPress. So, you can skip this step for further information.
You can perform a WordPress installation only on a self-hosted server in two methods. Either you install it manually or through cPanel. If you want to install WordPress manually, it requires a little bit of technical knowledge, but through the cPanel, it is super easy.
Although you can install WordPress in cPanel with just one click, you need to know the correct procedure. So don’t worry, I will explain the step-by-step procedure to install WordPress in cPanel.
Later on, we will look further at the necessary actions crucial to take when you finish the WordPress installation. Before we start the WordPress installation, you should have a little bit of knowledge about WordPress and Why you should choose it to start a blog.
What is WordPress?
WordPress is an open-source CMS that allows anyone to create any kind of blog or website on it. WordPress powers approximately 37% of the websites on the internet.
WordPress is licensed under the GPLv2 license which means anyone can edit or modify it free of cost.
So, you can say that WordPress is the simplest and most popular way to create stunning websites for your business.
Even though you’re not a developer, then you can create and manage the blog or website in a significantly easier manner.
Table of Contents
Which Kind of Website can be created on WordPress?
Primarily WordPress was a tool to create a blog rather than traditional websites. But the times have changed, and many updates have been introduced over the years.
Nowadays, WordPress has become the favorite tool for all of us to kick-start our business online.
Not only can you create a blog or website on it, but you can also create an eCommerce store on WordPress very quickly.
For base features and functions, you can use thousands of themes and plugins for free of cost to make your website professional and cut the effort.
You can create many types of websites like
- Blog
- Business Website
- Forum
- eCommerce Store
- Social Media Network
- Portfolio and Resume
- Membership Website
- Many more than you dreamed
Why Should We Use WordPress?
As we discussed earlier, WordPress powers approx. 37% of websites that you see on the internet. You can find one website in four which you visit is built on WordPress.
But what about you? No matter what kind of website you want to create on WordPress. Here are some excellent reasons why you should use WordPress.
1. Free and Open Source
It is one of the incredible benefits of using WordPress. You need not pay anything for the software. However, you can use it only when you have a domain name and a self-hosted server.
Along with that, you can also use thousands of free themes and plugins to make your work easier and to add more features and functions to your websites.
2. Easy to Use
Even if you are not a developer, you can also create any website quickly. Thanks to WordPress having tons of free themes and plugins in the WordPress library.
Themes – it is mainly used for giving a better look at your blog or website.
Plugins – it is primarily used to add essential features and functions to websites.
The WordPress library contains approximately 50000+ WordPress plugins and 5000+ WordPress themes for free of cost.
Many themes and plugins come with the premium version, allowing you to make more unique features and functions.
So, you have plenty of options to create any type of website easily.
3. Easy to Install
You don’t need technical or coding knowledge to create a blog or website on WordPress.
Nowadays, almost all the hosting providers either give you pre-installed WordPress or provide dedicated tools to install WordPress with one click.
We will see further the full step-by-step guide on how to install WordPress in cPanel.
4. Easy to find Help
WordPress is one of the most popular CMS and powers millions of websites. In this case, it’s effortless to find Help whenever you face any issues.
You can find many
1. Blog
2. YouTube Channel
3. Tutorial
4. Developer
5. Forum
6. Facebook Group
Note – Although You can register your domain names according to your business from any domain registrar like GoDaddy, Namecheap, etc. By comparing price differences.
But you must be very conscious while purchasing the best web hosting. Here you can find more details about how to choose the best Web hosting for your blog.
I suppose you have both domain names and web hosting. Now, what next? Let me clear it.
Important Note
Almost all the hosting providers offer the same software to manage your website data called cPanel. But it may happen that some companies are not using cPanel, and they built their control panel to operate the website like a FastComet and maybe for others also.
This article becomes more useful for all users who have hosting, which is supporting cPanel. You can efficiently perform any activity in any Hosting server by reading this blog post.
If you want something on SiteGround, let me know through comments. I will try to solve your problem.
Next, we will see how to add domain names in a multi-domain supported web hosting plan.
This Tutorial is Based on ResellerClub Hosting (Having cPanel Software) and GoDaddy Domain Registrar. It might happen you will not see the same interface in all domains and hosting service providers.
But the process will remain the same; you have to change the Domain’s name server with the hosting nameserver.
1. How to add Domain Name in Web Hosting?
Adding a domain name in any hosting doesn’t require any technical support or coding knowledge. You can do it on your own. Here is a step-by-step guide
Step 1. You have to login into the hosting control panel (cPanel). You can access the cPanel tools by logging into your hosting account or typing the URL (https://yoursitename.com/cpanel) in the search bar. After that, you will see the window, which is shown in the image below.

Step 2. Enter your username and password to login into cPanel. After successfully logging in you will see the new page where you will get many options. See image Below

Step 3. Here you have to go to the domain section and click on Addon Domains.

Step 4. When you click on Addon Domains, you will see a new window to add your Domain. Enter the correct details as shown in the Image

Boom! Your Domain name has been successfully Added in the hosting account.
Note – You have to perform these steps only when you want to create a second website in a multi-domain hosting account. For the first Domain, you can proceed directly to the next step.
2. How do Activate/ Check the Status of the SSL Certificate?
As I said earlier, almost all hosting providers are offering free SSL certificates. So, you must have a check status or activate SSL for each Domain in such a situation.
You do it by using cPanel software. You log in to your cPanel and locate the Security tab and click on SSL/TLS Status. After that, a new page will open where you will see all your domain and SSL certificate status.

3. Connecting Domain Name with Web Hosting
Although You can install WordPress before connecting the domain name to the hosting server, there is no use. Because it will not work correctly, it means you will not see any data like how your website looks, and you can’t even access your WordPress dashboard.
I highly recommend you first connect your domain name to your hosting server. After connecting, the domain name to your hosting server will take 24 hrs. to propagate (Pointing) the Domain after connection. It is also called DNS propagation time, which is the same for all.
It is also called the changing of Nameserver. So, wait for the successful propagation of your DNS and the Pointing of the Domain to your hosting.
Here are two conditions related to connecting a Domain name to your web hosting server.
Condition – 1.
If your Domain Register and Hosting Provider Are the Same, in this condition, you don’t need to connect your domain name to the server. You can directly perform WordPress installation through cPanel.
Condition – 2.
When your Domain Registrar and Hosting Provider are Different, you must connect the domain name to the hosting server before installing WordPress. Here are step-by-step guides to connecting a Domain name to the web server-
How to Connect Domain Name to Web Hosting?
It is effortless and so simple that you can do it by yourself. Follow the steps which are given below.
Step 1.
First of all, you have to log in to your hosting account and search for Nameserver. When you click on Nameserver, you will see a minimum of two Nameserver in every hosting account, which is shown in the image-


Step 2.
You have to copy all the nameservers and paste it on the notepad. You have to add it to the Domain DNS management Zone. Now you log in to your domain registrar account and go to the DNS management option for the Domain which you want to connect.
Here is the DNS Management area of Mine in the GoDaddy Account. When you click on DNS, you will see the following interface, which is shown in the image below-

Step 3.
Now Click on the Change Button and it will take you to the next page. Here you have to paste your nameserver, which you copied earlier. By default, you will see two nameservers options. But if you have more than two nameservers, you have to click on the add nameserver option to add more. Check image below

After successfully adding the nameservers click to save it. After that, you have to wait for 24hrs to propagate it properly. Sometimes it takes less than that, but the average time is 24hrs.
You will get notified by the domain registrar that your nameservers have been successfully changed. Now you are ready to proceed to the next step.
How to install WordPress in cPanel?
Till now, we have completed the following step
- Knowledge about WordPress and Why should we use it?
- How to add Domain in Hosting Account?
- Checking Status or Activating of SSL Certificate.
- How to Change Nameserver or Connecting the Domain Name to Hosting Server?
Now we will move to the main topic, which is How to install WordPress in cPanel. Installing WordPress in cPanel is very easy, and you can do it with a single click.
But you have to do the correct setting for that. So, see the step-by-step guide for a better understanding. Follow me to do it without any mistakes; let’s dive in.
Step 1.
You have to login into your cPanel and search for a softaculous app installer. You might see it at the beginning of the Bottom of the cPanel. In case mine is available at the beginning-
Now you click on the softaculous app installer. Here you will see many application scripts for one-click installation. However, we are learning how to install WordPress in cPanel so we have to click on the WordPress option.

Step 2.
After clicking on the WordPress option, you will be redirected to the next page, where you will have many options. But you have to click on the Install Now button for further action. See the image below-

Step 3.
When you click on the Install Now Button, a new page will open in front of you. It is the main page where you must perform all the necessary settings for your WordPress Blog or Website. See the image and follow the step one by one-

1. Choose WordPress Version to Install
2. If you have activated SSL, then Choose https; otherwise, leave it http. Here you can also decide the blog URL, whether you want to use www or not. But my recommendation is to select without the www URL.
3. Select the Domain name on which you want to install WordPress.
4. Leave it Default or Blank
5. Enter your Site Name Here
6. Set a Slogan for your blog
7. Enter the User Name for your WordPress Dashboard
8. Set Strong Password for WordPress Dashboard
9. Enter a Valid Email Address Here
10. Select your blog Language or keep it English
11. Select to install Plugin or Leave it Default
12. Keep it default
13. If anything, is there, then delete it and Leave it Blank
14. Checkbox as per your requirement
15. If you want, then select any theme or leave it for the default theme.
16. Finally, if all is OK then Click to Install WordPress
After clicking on the Install button, it will take a few seconds to install. On successful completion of WordPress installation, you will be redirected to another page. See image below

Wow! You have completed the WordPress installation in cPanel. Here you will see the direct access URL (Link) for your blog homepage and your WordPress Dashboard.
Step 4.
Now you will get two options to access your WordPress Dashboard. Either use a hosting account or type https://yoursitename.com/wp-login.php or https://yoursitename.com/login. If you are using a URL then this login page will be shown to You. See Image

Then you enter your username and password here to access WordPress Dashboard. After login in, you will see your WordPress Dashboard where you have to accomplish many things and settings.

Wait a minute,
Now you have to accomplish some more settings, which are very crucial to do after installing WordPress. These settings are straightforward but essential to complete for every kind of Blog or Website.
We will see them one by one, and we will finish them right now,
Let’s start it,
Essential Settings and Activity after New WordPress Installation
Although you can perform all these settings and activities at any time, I highly recommend that you accomplish it right now. It would be best for you because you might forget it in the future and face an issue.
So why leave it? Let’s finish them right now so that you can focus on high-quality content creation. Follow me and do it without any mistakes.
Note- All the settings and activity can be done only when you log in to your WordPress Dashboard. So, First login into your WordPress and follow the Steps-
1. WordPress Default Settings
When you finish WordPress installation successfully soon after, you must do the following WordPress default setting for your blog. Let’s see them one by one.
A. General Settings
Here, we will set the site name, tagline, Correct format of Blog URL, Email Address, New user Access, Site language, Time Zone, Date & Time Format. See the image below for a better understanding.

Note – Although you have set it during your WordPress installation. Now you can cross-check and, if required, make the change as per your need.
B. Writing
These settings do not require change. You can leave it as default.
C. Reading Setting
These settings are directly related to your blog homepage. You can set your blog Homepage layout and how many posts you want to show on the homepage.
Here you can decide the homepage visibility whether you want to display the default theme homepage or set the custom homepage. It means what you want to show on the Blog Homepage.

Note – For custom homepage displays, you have to create a separate homepage; you can set these settings after that. You can also control your site from being crawled by search engine bots. Make sure it should be allowed.
D. Discussion
Here, you can manage the post settings, comments, and Comments moderation activity. I recommend you to set it as per your desire.
E. Media
Here, you can manage your media upload and their size. Also, you can set the media to get organized as per the date and time. These settings are not very important, but you must have a look at them.
F. Permalink
These settings are essential and play a crucial role in SEO. In such a situation, you should never ignore it. You have to set a Default and correct post URL, which increases your search rankings.
If you are not setting it correctly, then it hurts SEO. Here you will be able to select how your post URL looks in the search result. The best permalink setting is Post Name. See in the Image

Note – If you use any SEO Plugin, then you can set the desired permalink for each post in the future. But if you don’t want to use any SEO plugin, then these settings would be the default post URL.
2. Complete Your WordPress Author Profile
This setting contains information about you or any WordPress author. Here you have to enter some information about yourself and your social media identity.
You can also change here, the WordPress Dashboard color combination, and WordPress Login in Password. If you use any SEO plugin, then you can optimize your Profile easily. See the image below

3. Create Some Important Pages
You must create some essential pages for your blog. It is vital for any website. If you are doing this, you are expressing yourself to your audience and google also.
All these pages are mandatory to have as per Google Guidelines if you want to create a website and bring it online. You are also building trust with the visitor and towards Google. The following pages are required.
- About us (Must Have)
- Contact us (Must Have)
- Privacy Policy (Must Have)
- Disclaimer (Must Have)
- Terms and Conditions (Optional)
All the pages which are mentioned above describe you as well as your blog properties. If you are not doing so, that means either you are fake or suspicious in the eyes of Google and your audience.
For creating the essential page, follow the steps- Go to WordPress Dashboard – Pages – Add New. See the Image Below

Create all the pages one by one and make sure you have entered the correct information on all the pages. If everything is OK, then publish them.
Note – About us and contact us pages must be created by yourself but you can take the help of online tools to create Disclaimer Page and Privacy Policy Page.
4. Blog Categories
It is also a crucial step that you have to take. You can divide your blog Niche into various categories and will help search engines understand your blog content.
For creating the categories, follow the step – Go to WordPress Dashboard – Post tab – Click on Categories and Create new types. See image Below

By creating the categories, you can organize your blog post easily. It is an excellent idea to sub-categorize your Niche. It gives an incredible user experience in finding blog content quickly.
5. Add Meta Description for Your Blog
You must add a good meta description containing text about your blog topic. It helps any search engine to understand your blog content as well as your blog topic.
It also increases the probability of better search results and clicks rate. You should always provide actual data in the meta description to avoid getting confused by your reader and google bots.
It shows in search results along with your blog URL. in such a case; it should be eye-catching and not more than 160 characters. If possible, add your main keyword to the meta description.
You can add the meta description in two ways. Either use any SEO plugin or add it manually. Both methods are easy; you can do it quickly.
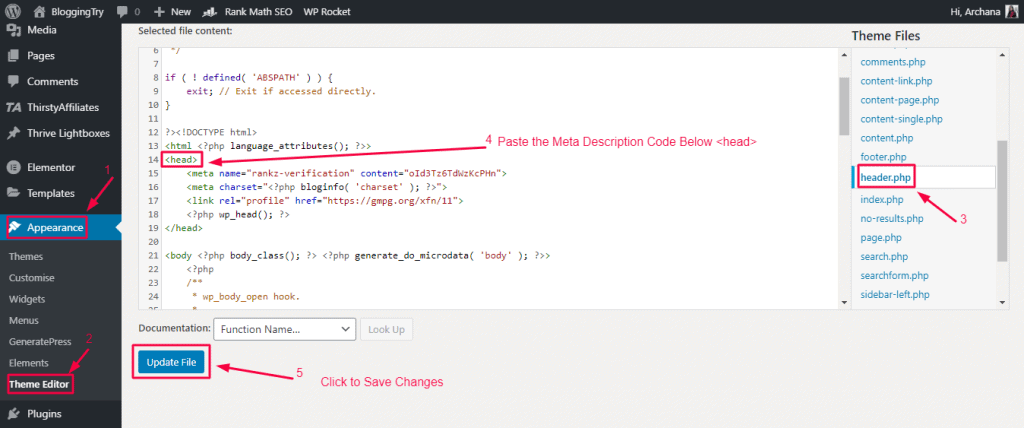
If you want to add the meta description manually, then copy the following code and make sure that you have changed the meta description with your content.
<meta name=”description” content=”Your Meta Description”/>After that, copy this code and go to Appearance – theme editor – header.php and search for <head>. When you find it, just paste the code below <head>, which you have copied. See the image below.
6. Perform some Technical SEO audit
Technical SEO is the advanced part of On-Page SEO, which helps search engine bots for better site crawling. You can find here the 10 best technical SEO audit points for better understanding.
7. Add Google Analytics for Website Evolution
It is another essential point that will be helpful for your blog. It is a Google product that is available free of cost. If you have a Gmail account, then go to googleanalytics.com and follow the steps to sign up.
Google Analytics helps you to optimize your site. It’s also valuable in monitoring the number of page views and daily visitors to your site. You can even track how people are finding your website, and monitor real-time visitors.
8. Install a Lightweight and Customizable WordPress Theme
Any WordPress theme gives a stunning look to your website. You can manage your blog layout, Sections, Colour, Fonts, etc. easily. For doing this, you can use a free theme or any premium WordPress theme.
Make sure; if you are using any free themes, you can customize your blog at a certain level because almost all free articles have less or no customization options. Also, they can be heavy for your blog, which increases your blog loading time.
In such a situation, I would like to advise you to spend some money on premium WordPress themes to avail yourself of more features and fantastic customization options. The premium WordPress themes are well-coded, and SEO optimizes, giving your blog the best performance.
A. How to Install WordPress Theme?
It is an effortless step, and you can do it by yourself. You can install your WordPress theme in two ways either use the WordPress library or upload it. If you have downloaded or Purchased a Premium WordPress theme, you have to upload and activate it.
For doing so, you have to go on the WordPress dashboard and follow the steps, Appearance – Theme – Add New See Image


Either you select a theme from the WordPress library or select the Upload button to Install themes. You can choose the following popular and best WordPress themes: GeneratePress, WpAstra, Divi, MythemeShop Themes, etc.
When the theme installation process is completed, then you must activate the particular theme. After that, you must do the following things for the best result.
Since I am using GeneratePree Pro on my blog and getting an amazing performance. So, I would Highly recommend you to try it.
B. Customization Theme and Blog Navigation
It is the essential factor of any site. It determines your site’s future. Because if your website is not fully customized and doesn’t have apparent navigation about articles, people will get confused.
In such a situation, your site rankings will go down in a short period. One Question for you, will you like any blog that has no navigation and is not well customized according to content?? The answer is a definite NO.
Therefore, when you install WordPress, you must use a fully customizable, SEO-optimized, responsive & fast-loading theme for your blog.
Make it as simple as possible. Don’t decorate it like a bride. Organize its navigation (Category) as per content so that visitors will have the ability to recognize each part of your website.
C. Blog Customization
Next, firstly you pick your blog content fonts & colors carefully. Make them clean and straightforward as possible for a good look. I also suggest that you keep them continued throughout the blogging.
It will help you in creating your brand name. It will make you stand out from the blogging crowd. Don’t change it regularly. To get a better view of any site, I recommend that 2 Fonts and three colors be consistent throughout your blog.
Don’t attempt to decorate your site by any means. Many themes’ authors provide a dedicated theme control panel where you can manage your Site elements.
If your theme doesn’t have a dedicated theme control panel, go to the Appearance – Customize option and do the necessary customization there.
D. Favicon: –
It’s a little icon that will appear in the browser tab along with a post or page URLs of any website. You have to be sure that it is uploaded correctly.
The best dimensions of the favicon should be 512×512px. It provides a professional look for your blog. For setting it up, log in to the WordPress dashboard, go to appearance – customize – website identity – Site Icon, here you upload your favicon, and publish it.
9. Install Necessary WordPress Plugins
WordPress Plugins are specially made to add new features and functions to your blog, making your work easier. There are no limitations on installing the WordPress plugin, but you have to make sure that you don’t keep unwanted and useless plugins.
If you are using a massive number of plugins, it slows down your blog or website. You can use the free WordPress plugin from the library. But I highly recommend you use some essential premium plugins.
Because the premium version of the plugin allows you to avail more unique features and functions, they are well coded, SEO optimized, Fast loading & Lightweight, which improve your Site performance.
Here is the list of some basic and essential plugins
- Page Builder – Elementor Pro, Thrive Architect
- SEO – Rank Math, Yoast SEO Plugin
- Caching – W3 Total, WPRocket
- Social Share – Social Snap & Novashare
- And many more as per your need.
For WordPress installation, follow the Steps – You have to go to the WordPress dashboard and follow the steps, Dashboard – Plugin – Add New – Here, either you select the plugin from the WordPress library or select the Upload button to Install the plugin. After a successful installation, you must activate the particular plugin.

10. Create a Social Profile on Various Social Media Platforms
As you know, anything becomes highlighted when its promotion occurs. To do so, you have some social networking marketing or another method. For this, you have to earn the existence of your site on various platforms.
It depends upon which social media network you are likely to use. Just keep these things in mind that all accounts are called by your blog’s name, if possible. Then set up your social networking descriptions and relevant keywords carefully related to your blog.
Awesome!!
Till now, we have done almost all the settings and activities successfully. Now you can focus on producing high-quality content for your readers. Let’s begin with it
11. Start Writing and Publishing High Quality and Informative Content
Now you are ready with a well-customized and professional-looking blog. You need to publish some content for your blog. So, write some good and quality content on your Niche and post it.
Your site has substance, and you can begin promoting them in your social networking network. The content you have published must be unique.
Then you may acquire some viewers for your blog. In this case, your blog should have sufficient material. Otherwise, your audience will never like an empty site.
12. Start Collecting Email List from Day One
You should never dismiss this point since this will help you in your long-term blogging career. So, I would suggest you Start Collecting Emails & create your Email list from the start of day one.
Give a choice to subscribe to your blog newsletter by producing an option form in your blog. If the readers like your articles, they subscribe to your newsletter. If they do this, your Email listing will automatically grow.
In case you’ve collected a massive amount of Mail, this list will assist you. This listing is going to be the primary source of driving traffic to your blog.
Because Google may change its algorithm at any time, social networking platforms may also do the same. In such a situation, the negative impact will be there in your blog traffic.
You may lose your valuable visitors, and at that time these email lists will help you balance the visitor quantity.
13. Start Promoting Your Blog/ Content
You must learn how to do content promotion—since if you cannot promote your stuff, then creating a website is a total waste of time. You will gain visitors when you start promoting your site or content from day one.
A successful blogger uses the 80:20 formulation to become famous among all bloggers. He spent 20% of his time writing content and 80 percent of his time promoting the material.
Pros and Cons of using WordPress
Every Software has some awesome features and certain limitations. Here are the WordPress Pros and Cons which you have to remember while using it.
Pros
- It is an Open-Source Software
- Tons of Free Themes and Plugins
- Flexible and Easy to use by Anyone
- SEO Optimized and Responsive
Cons
- You need Domain and Hosting
- Chance to Attack on Website
- Customization Limitation
- Not having One to One Support
Warping up
So, Friends! Finally, we’ve completed this article. We have learned many things, starting with how to install WordPress in cPanel to create a website.
I am well aware that it was such a long article, but I tried to cover almost all essential things before installing WordPress and Installing WordPress.
I am quite sure that you enjoyed this article and learned many new things. If you are a beginner, then you must follow this article’s best result. If you find this blog post helpful, then do me a favor.
Share it so that other needy people may get the benefit of it. You can join my private and VIP Facebook Group to learn more about blogging.
I advise all of you not to neglect any settings or activities because they will give your site a solid foundation. That will make you distinct from other bloggers in the future.
Thanks for giving me your valuable time to read this blog post